Zippered pouch stitched with Asagao Kugurizashi sashiko pattern
March 30, 2024

How to stitch the Asagao sampler (Kugurizashi Sashiko Style)

This blog will show you how to stitch Asagao, a Kugurizashi (weaving under stitches) Sashiko pattern.  It contains more general stitching information than my other blog post for how to stitch these Kuguri patterns. If you don't need that information just scroll down to the step by step for how to section.
Asagao Kugurizashi Sashiko stitching made into a zip pouch

What you will need: the pre-printed fabric sampler, sashiko thread and sashiko needles

 What is Kugurizashi Sashiko?

Kuguri sashiko is a two step sashiko stitching style. First you stitch a hitomezashi (one stitch) sashiko design and then you weave under those threads to create a kugurisashi sashiko design.

Hitomezashi  designs are made up of single stitches in straight lines across the fabric. The stitching covers the fabric much more densely than the Moyozashi Sashiko (large sashiko designs used more for 'quilting' layers of fabric together). 

Kugurizashi is a more advanced two part sashiko stitching technique which involves using the Hitomezashi stitching as the base layer to weave threads under to create beautiful patterns and textures.

There are a few things it helps to know before you start stitching. The first is that the printed marks on the fabric will wash away completely when you are finished stitching, so don't get the cloth damp before that! Also, please don't iron it before it is washed or the marks may set and not wash out :-(
Thread: For this design you will need about 80 meters of sashiko thread. (I used three skeins of Olympus 20 meter skeins sashiko thread cyan blue #17 , and one skein of yellow #16)
You are meant to stitch through two layers of fabric:
You may like to prepare your project by folding the fabric with the right sides together and stitching the raw edge together. Then turn the fabric right side out and smooth it so that the printed area is  facing you and there is a smooth unprinted layer under it.  You can baste around the edges if you like, but I find they stay together well enough as is.  This preparation will let you bury your thread ends between the fabric layers and help make everything more tidy and beautiful :-) (I don't usually do this step because I sew my stitched piece into other projects so don't let my hanging threads on the edges in my photographs confuse you :-D)
One more thing. If you are using skeined Sashiko thread see this blog for how to keep it from becoming a tangled mess.


Okay, let's stitch Asagao

You begin the stitching by stitching all the diagonal lines from left to right (or right to left- it doesn't matter, just be sure to stitch each line all the way across the fabric each time) 

As noted above, you can see in the following photos that I started my threads with a tiny knot and/or hanging threads which I stitched into the margin of the design. I use my stitched fabrics to sew into other projects, or I back and hem them, or I put borders on them, so the knots or hanging threads don't matter to me, but you can bury them between the fabric layers.
Next, Sashiko stitch the diagonal markings in the other direction to create X's


Now start the Kugurizashi by weaving under stitches. 
There are tiny dots along the edges of the fabric to mark your start and stop points.
  • Start by bringing your needle to the front of the fabric at a small dot.
  • Weave through the Xs for the entire row, then push your needle back through the fabric at the dot at the end of the row.  
  • Bring your needle back to the front very close to where you put it through to the back.
Tip:  It is easier to use the eye end of your needle to go under the stitched threads - you are only going under the threads NOT into the fabric.

Weave back down the row then move the the next row by coming back to the surface at the next dot. 

At this point you can use one sashiko thread to stitch several rows because they are short. Later the rows will be too long. I don't like to end a thread in the middle of a row so I plan to always start and end at an edge. It does means you use more thread.

sashiko and weaving

Here is this step finished: 


Here is what the back looks like:

back of sashiko and weaving stitching

 Next we start the last step, which is actually the same as the last one but stitching on the opposite diagonal. 

I changed thread colour to make it easier to see. Might have been better to pick a darker colour :-)
Start at the end of a blue line.

Still using the eye end of your needle, weave the line passing under the X's.

sashiko and weaving

The threads are a bit loose at this stage, and they should be, so resist the urge to want to make them all snug. It will tighten up as more lines are woven.

sashiko and weaving

Continue back down

sashiko and weaving

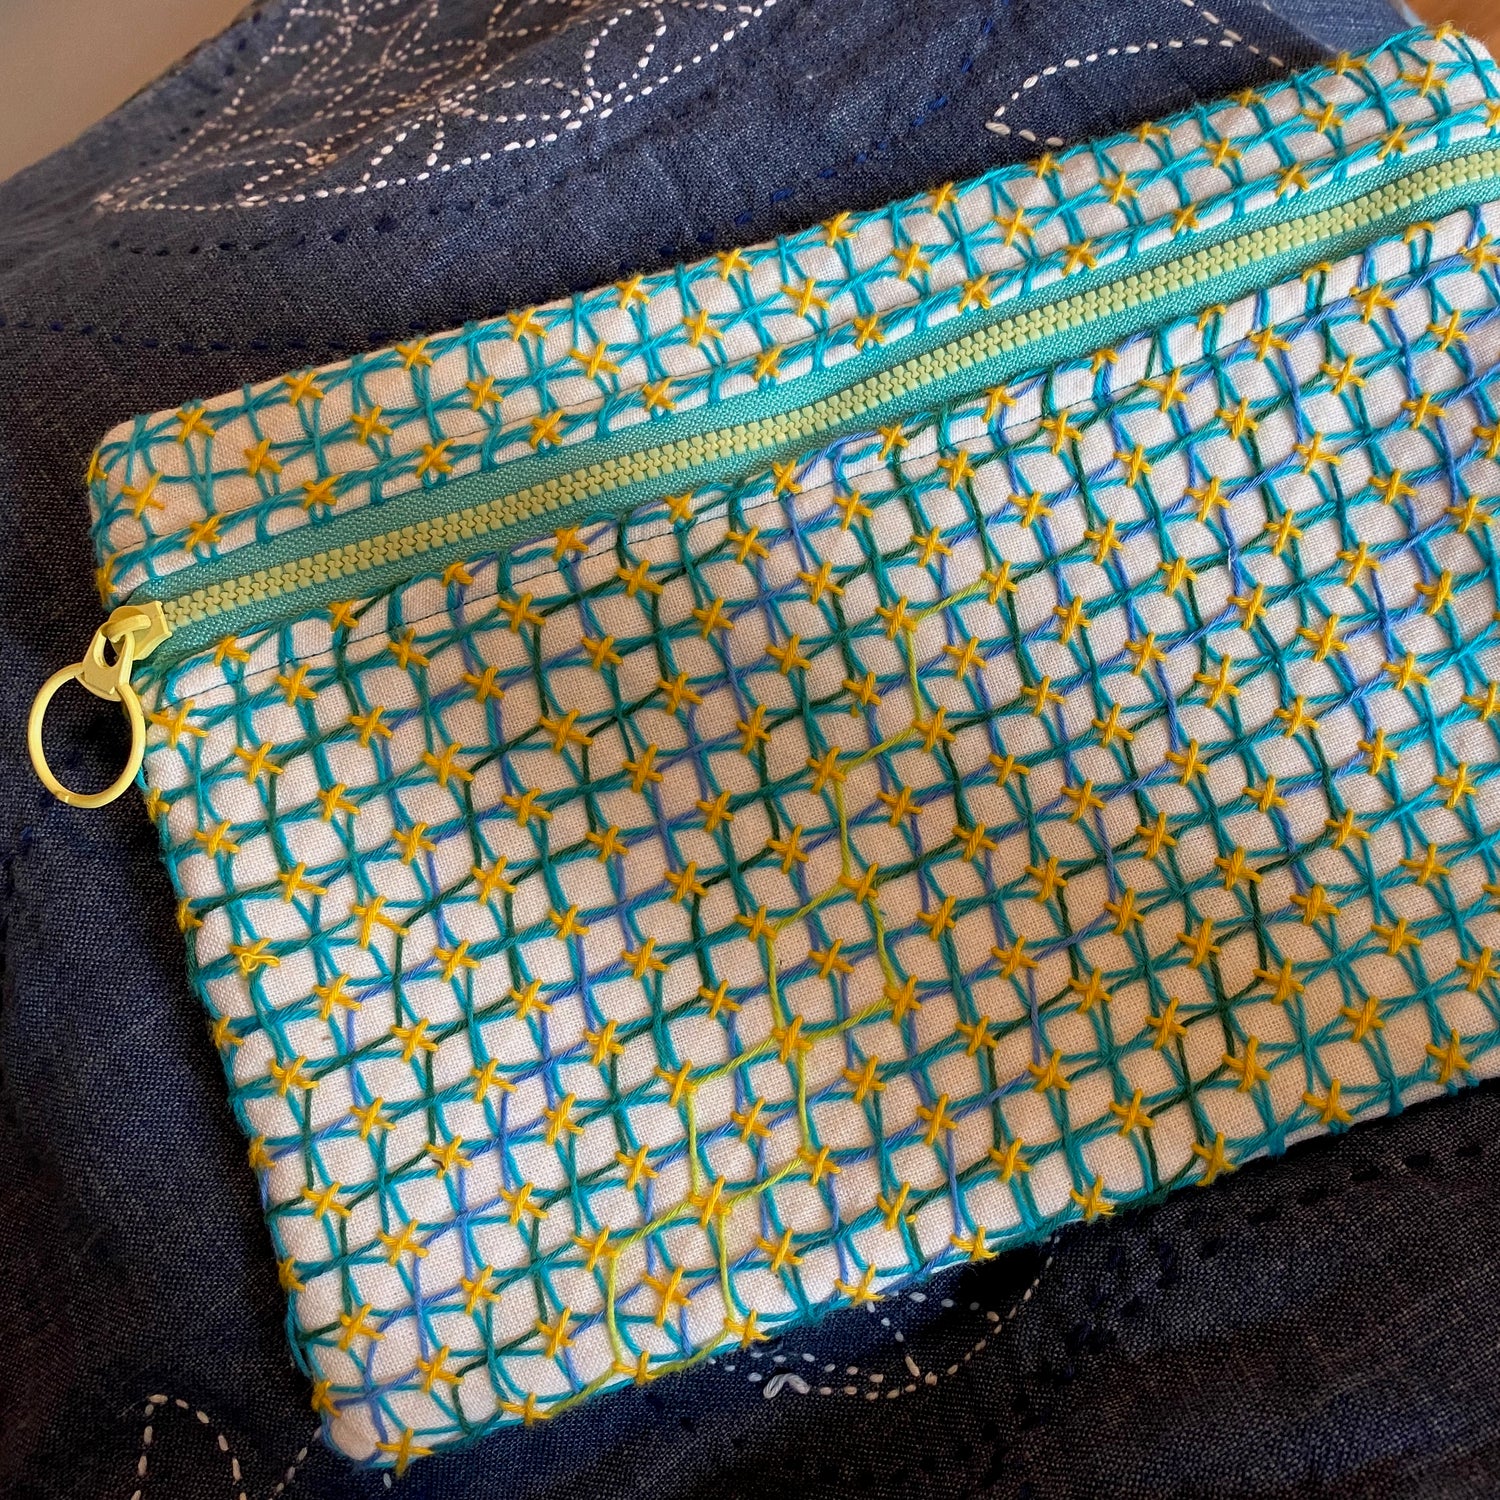
Here are samples of the design stitched in two colours and three colors. The blue and yellow one has been finished and washed, so the threads have snugged up in the fabric nicely.. 

sashiko and weaving comparison

Happy stitching!
Susan

sahiko and weaving on navy fabric